Tech; Race Bucket Install

Always looking for weight reductions and wanting a different look inside the cab I purchased an RCI bucket and cover with manual adjuster plus 5 point harness (last year). I also got the universal mounting kit. The mounting kit was a joke, it is only 4 pieces of L bracket with a couple holes drilled in each. For $45(Cdn) they cost, I probably could have got the same useless pieces from Home depot for about $15. Don't bother with the universal mounts cause they won't work. Due to the fact the Rams floor has 3 different heights where the seats bolt down. You pretty well have to use stock pedestals. I found a 97 at the wreckers (finally after 1yr) and got the whole 60/40 bench seating and pedestals for $100+tx). The seats will be made into garage seating. (pretty good shape) The manual adj. brackets will be stripped and modified for the new seats.
Tools & Parts Used
ratchet set
4 1/2" angle grinder
3 metal cutting wheels (for grinder)
bench grinder (milling machine better)
drill press/good electric drill (I used both)
1/4" drill bit
3/8" drill bit
safety goggles
6' of 3/4" steel tubing
8x grade #5 bolts 5/8"x 1 1/2" (may look for higher grade)
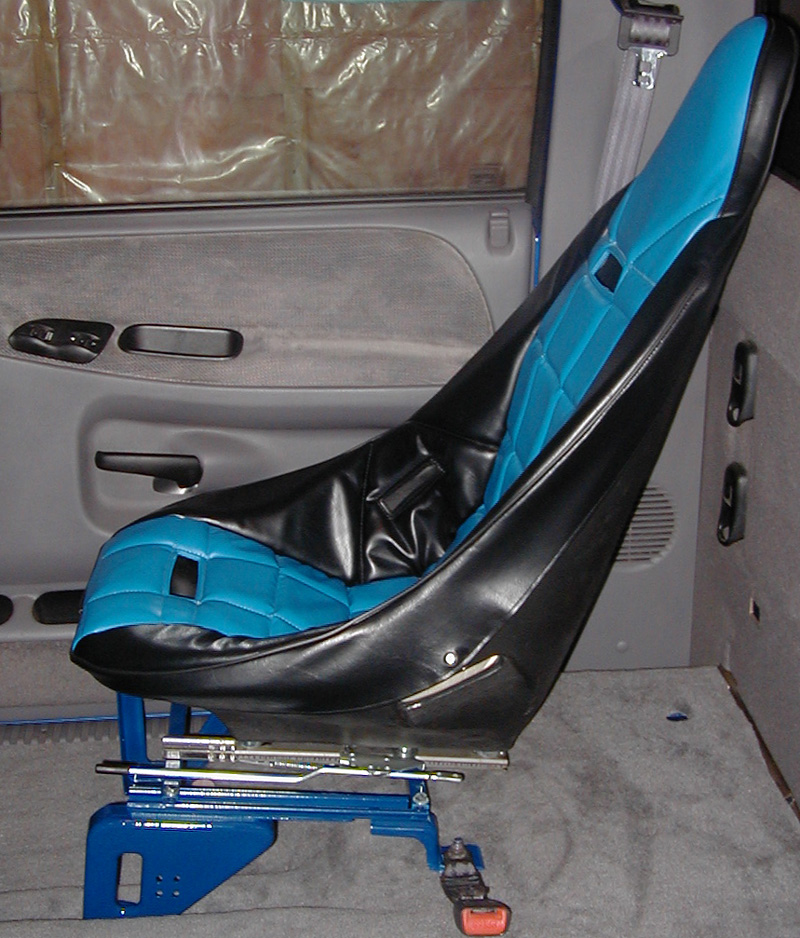
RCI Hi back Race Bucket
RCI seat cover (blk/blue)
RCI manual adj sliders
Stock manual seat base/pedestals
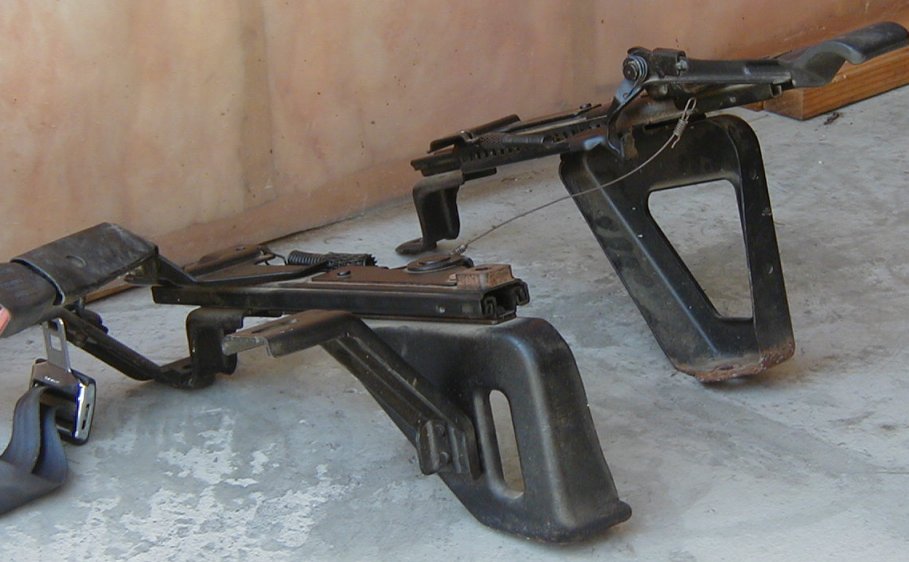
First thing was to separate the base/pedestal from the seats, then to grind off all the manual adjuster.
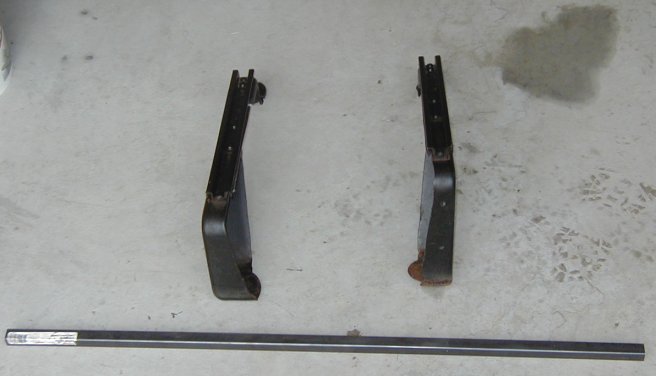
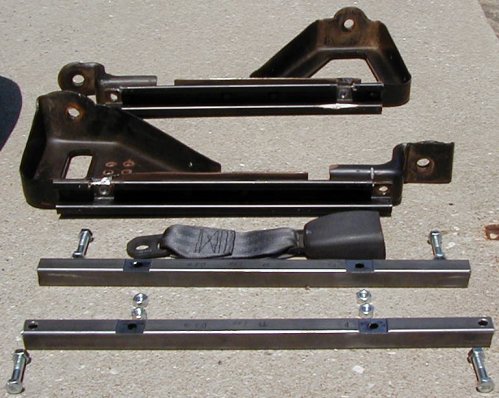
I only wanted to keep the pieces that hold the seat up. So it was necessary to drill out the 4 rivets (1/4") holding the side pieces to the base/pedestals. Side pieces hold up the center seat. After that, I drilled out the 2 rivets on top that hold the swivel piece for locking in the adjuster (wire between it and other side) That allowed the top slide rail to be cut (angle grinder) the full length down the side of the rail. Cutting removed the whole top piece and rollers inside leaving only the lower rail. I kept the lower rail as it ties the front and rear of each side together. Once all that was removed then I cut off the last piece of the adjuster (where the swivel piece locked into). This left only the base with the bottom "U" shaped rail sitting on top. Because of the narrower footprint of the new seats mounting points, cross bars would be needed for the seat to sit on. I installed the bare pieces into the truck and took measurements between the two sides. After getting the front rear #s I cut the 3/4" boxed tubing to a hair longer than needed ( new crossbars). Then measured the distance of the studs on the bottom of the new adjuster already mounted to the seat. I marked them for being centered on each of the cross bars. Drilled the holes in the two cross bars and mounted them to the seat. Test fitted the seat with crossbars attached and rested it on top of the pedestals mounted to the floor (adj. all the way back) Carefully sat in the seat to see if the height was suitable. It turned out to be a tiny bit high but with my plans it should work out. I marked the cross bars locations on the chopped down pedestals. Only a 3/4" wide piece was taken out of the inside rail down to the bottom of the "U". That way the inside rail of the U bar would hold the crossbar front to back. The outside of the U bar would hold the crossbar from side to side movement. Took a bit to get them squared up with the grinder and the cross bars shortened slightly to fit snug between the two pedestals. Mounting the seat to the crossbars again I put it on top of the pedestals (after reinstalling them yet again) for another fit test. Every thing was good except still a bit high. I decided to use the bench grinder to notch the crossbars below where the new seat adj. bolted to it. Also removed the back rivet (drilled out) off each pedestal the held it to the U bar (2 held it each side). The back crossbar was resting on it. Another test fit after reinstalling everything again and it was much better height and angle. Next I had to drill the holes at the ends of both crossbars with the 3/8" drill bit. Next was put them on the pedestals and mark the corresponding holes. Removing the pedestals I used the drill press to drill threw the pedestals for the 4 holes to bolt the crossbars threw. Now it was time to reinstall pedestals to see if the crossbars and all the holes would line up with it in the truck. Everything buttoned up, time to check the height, slider, and sturdiness of it. Everything was great and looked pretty good.
|
|
|
|
|
Stock base/pedestals before removing adjusters and side pieces for holding center seat. |
Set of bases ground/drilled down with only the "U" bar left on top |
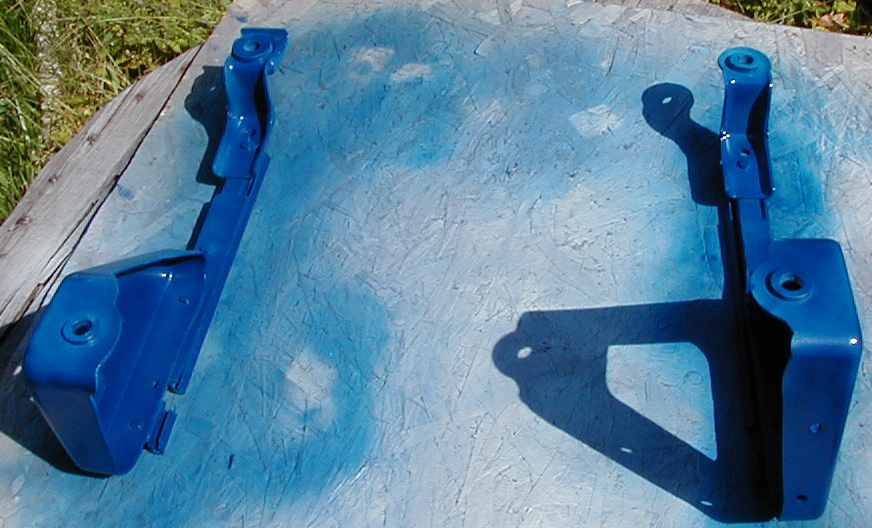
Bases notched and drilled with new crossbars drilled and ground |
|
|
|
|
|
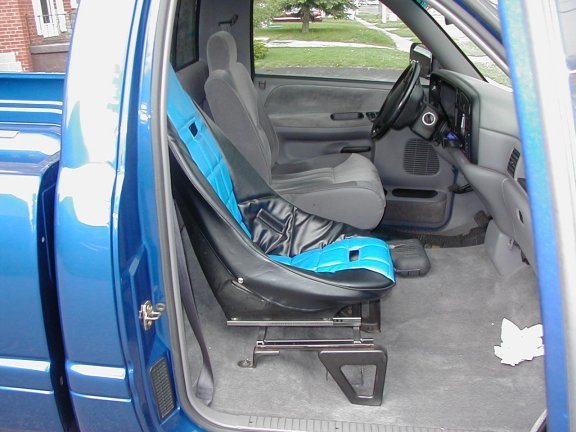
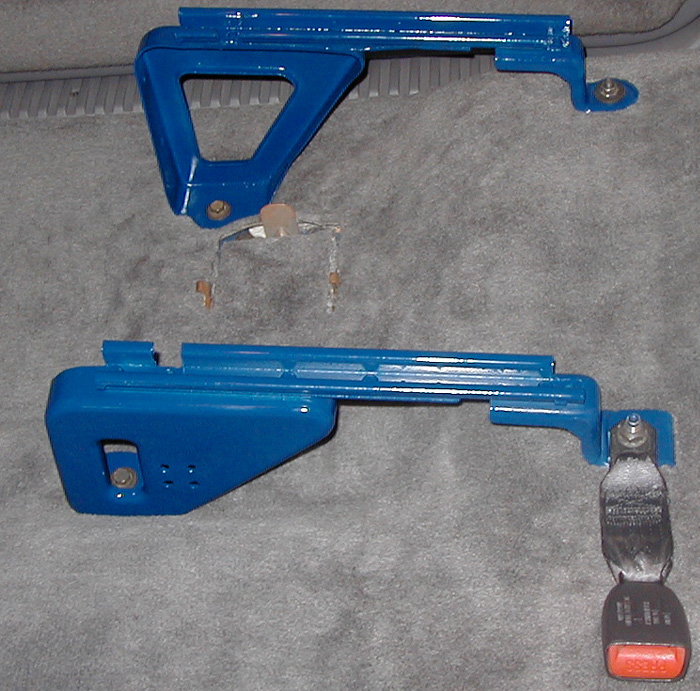
Everything bolted up to the pass. seat |
One down, one to go |
Thats my quarter! LOL, on to rnd 2 |

A far bit more work than I anticipated but I'm happy with the results.
Part II of install will be the painting of the parts (pedestals and crossbars)
Race Bucket Install Part II Painting
Tools & Supplies Used
compressor (5hp/20gal. min w/good cfm)
sandblasting attachment
50lb bag of sand(for kids sandboxes)
goggles
gloves
preferably a self contained spray box (didn't have)
a package of 400 grit & 600 grit of wet sandpaper
tack clothe
cotton shop rags (100% or it could scratch)
clean area to work in, well lit
I
|
|
|
|
|
Sandblast all the parts till they're down to bare metal. Fill any imperfections next if they concern you. |
Here they are with the first couple coats of primer on them. Don't start wet sanding till at least 4 coats to be safe |
If it runs your putting too much paint on. Be patient for the best results. Give runs extra time to dry before sanding out. |

For best results, don't paint on a humid or rainy day. A good # of coats of primer, paint and clear are needed for sanding between coats. You don't want to go down to the metal or coat below as you get farther along! I painted them in the backyard and gave them light coats. The hot sun would semi dry them quick (15min) and when they lost the sheen I would give them another coat. Once 4 coats were on I let them sit for 2 days. (started blasting other set). Once good and dry I took the 400grit to any rough area, bumps or runs. 600grit used for smaller imperfections and too smooth the whole surface of all pieces, poor painting can be fixed with light sanding. After going over the pieces with tack clothe and cotton rags they got another few coats of primer with a repeat of the sanding only using the 600grit. Once primed and smooth paint was applied in the same manner with only 600 grit sanding after. Again wipe down the parts with the tack clothe and cotton rags to polish up and start adding the clear coats. After a couple of coats the sanding process is repeated with the tack and cotton rags to finish off. Final coat I laid on thick enough to give a smooth surface and allowed it to dry for min. 48 hrs before handling (72hrs better).
|
|
|
|
|
|
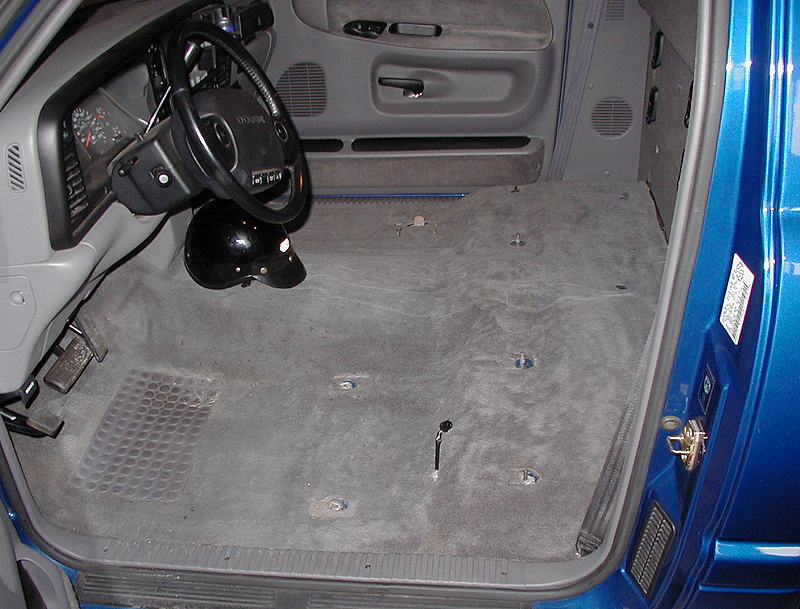
Tons of room with no seats or storage behind |
Passenger side pedestals |
Pedestals with the crossbars attached |
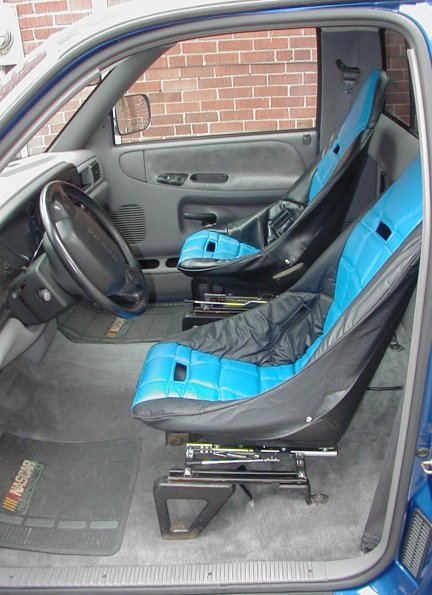
Passenger side completed |

|
|
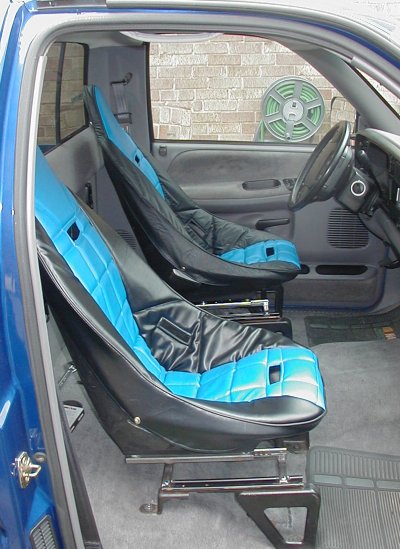
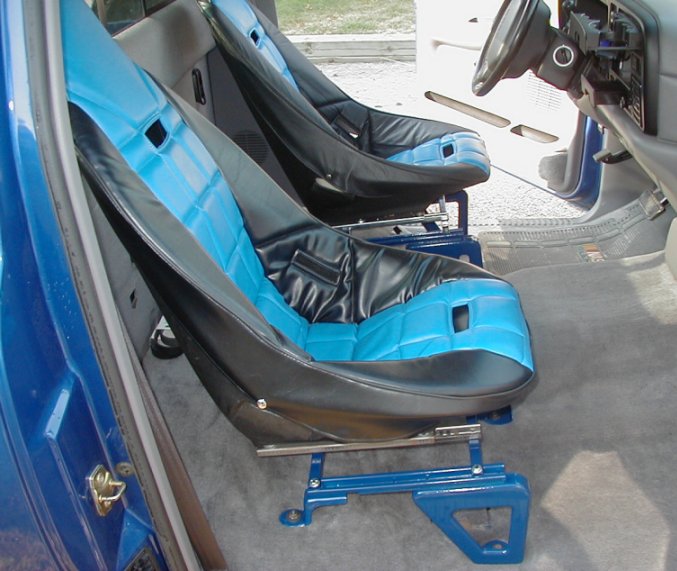
Both sides in and painted, really happy with the results. Look great and a big weight loss even with both seats in |
|

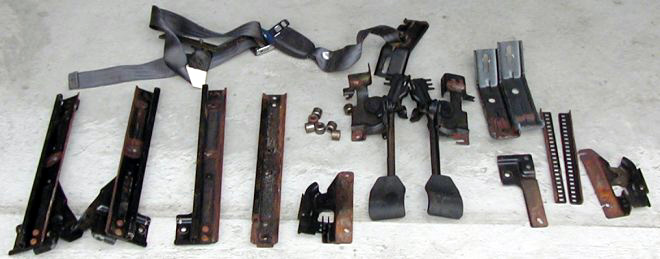
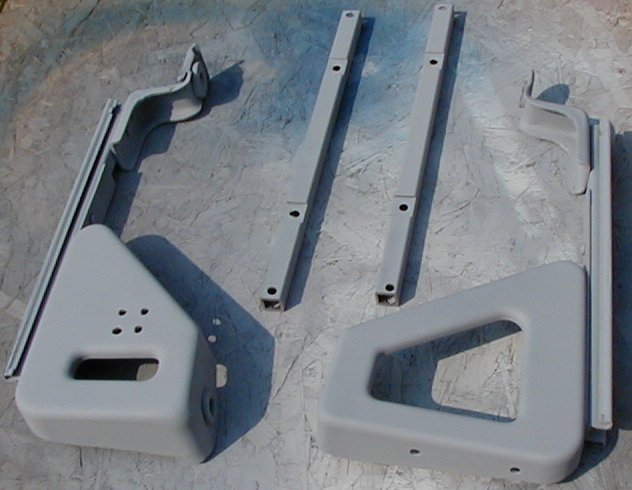
This is what was removed from the pedestals.
Return to Tech; or